So this wonderful and simple sauce appears in a huge number of dishes that I cook, but it is worthy of its own short entry because it is so damn good! It goes great with butternut or acorn squash dishes (when the chilled air of winter comes around my squash soup will make an appearance on this blog), I found that it works on top of fish and sage and red meats (lamb) are just a match made in heaven. Add some nutty brown butter goodness and this is staple sauce to keep in mind when you are looking for good rich flavor to spruce up a dish. Plus the crispy sage is indescribably good! A true story about these wonderful little treats: I was helping a friend cook a birthday brunch and she was using a recipe that called for sage brown butter to pour over sweet potatoes. After going through the process of making the butter and pouring it over the potatoes she looked quizzically at the crispy sage and asked me if we just throw it out. After a brief moment of sadness and panic passed through I acted quickly telling her that those are little flavor bombs of pure goodness. I quickly forced her to try a piece, her reaction was instantaneous and the same as anyone who tries these small bits of wonder for the first time. They have such a strong, unique flavor, and the result is that they just make things taste better.
All you need is fresh sage leaves, butter and a good small sauce pan that reacts quickly to changes in temperature (for this I like a copper/stainless steel combo, the copper is great for controlling heat and the stainless steel finish provides a nice background to observe the changing color of the butter, a dark background makes this difficult and if you notice the change too late it is hard to save the dish. This dish is not overly tricky but it does take some timing, as it is a fine line between wonderful brown butter and astringent burnt butter. Like everything that I cook this is all about using your senses rather than relying on a timer, and understanding the progression of the butter though its stages. Making this is quick, but takes some focus.
Start with a couple of tablespoons of butter
Heat sauce pan over medium to medium low heat
Melt butter in the sauce pan
When butter is fully melted at the sage leaves
Stir the sage leaves to make sure that they are fully coated in the melted butter
Now watch the mixture, it will begin to foam up, once the foam decreases stir regularly and watch carefully as the butter starts to brown.
Once the butter starts to brown be ready to move quickly
When the butter starts to changes from a very light brow to having specks of darker brown color (this is actually hard to put into words, and I will work on trying to get picture up, but it happens really quickly) remove from the burn and continue to stir consistently. The pan should cool quick enough to keep the butter from burning while maintaining the nutty flavor that comes from the browned milk solids.
That is really all there is too the sauce. Pour over whatever you happen to be cooking and use the crispy sage as garnish or grind it up to add to another sauce (or you can just eat it right then and there).
Sunday, August 29, 2010

Grilled Lamb Chops with poblano cream sauce over pan-fried polenta and grilled sweet onions

So I have been pretty bad about providing new posts recently. In an odd twist I have actually been somewhat diligent with my work, and since it has required reading pdf files and typing up notes by the time I am done I really have had no desire to stare at this little glowing screen any longer. But never fear, I am always thinking of new ideas and my payback for your patience is a dish of epic time killing proportions and serious flavor. It was created on the fly, but the result was so good it really doesn’t need muck tinkering (and I am usually very critical of my own creations).
Putting together this dish is truly a test of your procrastination skills and intuition of timing in cooking. It will take at least two hour to make depending on how much you spread out each step (with help you could do it in less). But that makes it perfect for when you really need to get away from your work. Trust me your mind won’t wonder from the task at hand, you won’t nag yourself to get back to being productive, and if you are making this for someone else I guarantee that they won’t call you out on your procrastination.
The mix of flavors that this dish produces is truly outstanding. The warm creamy texture of the corn polenta makes a wonderful base for the flavors that will pile up on top of it, and it does an excellent job of rounding out the dish. The hearty and slightly smoky flavor of the grilled lamb combined with the sweet pop of the onion mix perfectly with the slightly spicy and layered flavor of the poblano cream sauce. As an added bonus the hidden layer of sage brown butter just adds to the overall richness of the dish. It is a great dish to take outside on a pleasant late summer’s evening and enjoy the rewards of the work it takes to make. I served this dish with a glass of Cabernet Sauvignon, and while I am pretty new to trying to pair wines with my cooking creations, I personally thought it complemented the flavors nicely.
Each step in itself isn’t so difficult, but each one takes some time and working on getting everything to come together at just the right moment is a bit of a challenge (I had the grill going and 3 of my four burners, right up to the moment I was plating the food). So if you have people you trust to watch over one parts of the process, it might be wise to work as a team the first time you make this just to get the timing down, but if not I will do my best to give hints on how to time it well.
What you need for two large servings (2 chops each) or 4 small (1 chop each):
1 head of garlic (to roast)
2 medium poblano peppers (to roast)
4 lamb chops
1 sweet onion
A few tablespoons of whipping cream
A few tablespoons of white wine (I used some left-over Grenache blanc)
Polenta (here I cheated just a bit and used a tube of Trade Joe’s polenta)
4-8 fresh sage leaves
Salt
Pepper
Smoked paprika
Ground cumin
Butter
Olive oil
The first thing you need to do is roast up the garlic and peppers for the sauce.
For the roasted garlic, preheat the oven to 350
Take the head of garlic and cut of the top (non root end) in such a way that you expose most of the cloves)

In a small baking pan (I actually use a pie pan) place the garlic on a piece of aluminum foil and drizzle with olive oil and a pinch of salt.
Make a tent out of the foil around the garlic sealing the crease as best you can. (If you have a garlic roaster it makes life a bit easier, but by no means is it a necessary kitchen gadget)
Place in the oven and bake for 35-40 min.
This process will fill your kitchen with the wonder smell of garlic (and if you are anything like me will make you extremely hungry!)

One way to know when your garlic is roasted to sweet perfection is when the garlic smell starts to have sweet undertones. This way you don’t have to unpack your garlic only to find out that you have to repack it and stick it back in the oven a bit longer.
While the garlic is roasting in the oven, I roasted my peppers on the stove top using handy little stove roaster that I own. If you don’t have a roaster, you can do this either on the grill or in the oven under the broiler. (If you are using the broiler, I recommend roasting the garlic first and then doing the peppers).

Basically the goal of roasting the peppers is to char 70 to 90% of the skin. Using my roaster I just rotate sides every minute or so, and then look for the areas than need a bit more charring.
Once the skin in charred, place the peppers in a plastic bag and tie it shut, let the peppers sit for 5 to 10 minutes. (By doing this the steam from the hot peppers loosens the skin to make them easier to peel).
Once the peppers have cooled some, peel the peppers, do you best to avoid using any water in the process as it washes away some of the flavor.
After the peppers are peel, slice them open removing the seeds, core, and ribs.
Then slice the peppers into small strips.
Once you have the garlic and peppers roasted you can turn your attention to making the sauce.
Poblano cream sauce:

In a sauce pan, heat a few teaspoons of olive oil then add the pepper strips and around 5 cloves of the roasted garlic (they should slide out their casing fairly easily).
Sauté for one or two minutes, then add the white wine.
Right after the wine add:
~ 1 teaspoon salt
~ 1 teaspoon black pepper
~ 1 teaspoon ground cumin

Let the wine simmer down to about half its original volume.
Add the cream
Bring to a simmer and cook for an additional 2 minutes.
Transfer the sauce to a blender and blend until smooth. Check the taste, sometimes the peppers can have a bitter aftertaste, if this is the case add a pinch of sugar to counter the bitter (or use a small amount of agave nectar).
Set the sauce aside.

You can broil, or pan-sear your lamb, but for this dish I like the smoky undertones that using a charcoal grill provides (I use natural mesquite charcoal).
While your grill is getting hot, bring your lamb to room temperature and season with salt, pepper and a small amount of smoked paprika (or hot paprika) on both sides.
Also, slice the sweet onion into half-inch thick slices.
Once the grill is hot, things will get pretty hectic as you try to bring everything together.

Place the lamb over the hottest part of the grill (in this case we are not going for a slow cook, but a good quick sear on each side, I like my lamb on the rare side so it doesn’t take too long to cook).
At the same time put a little olive oil and salt on the onion slices (I used two rounds and had some a bit left over) and place them on the grill as well.
Once the lamb has been on the grill for about a minute transfer your pepper cream sauce back to a sauce pan on the stove on low heat to warm.
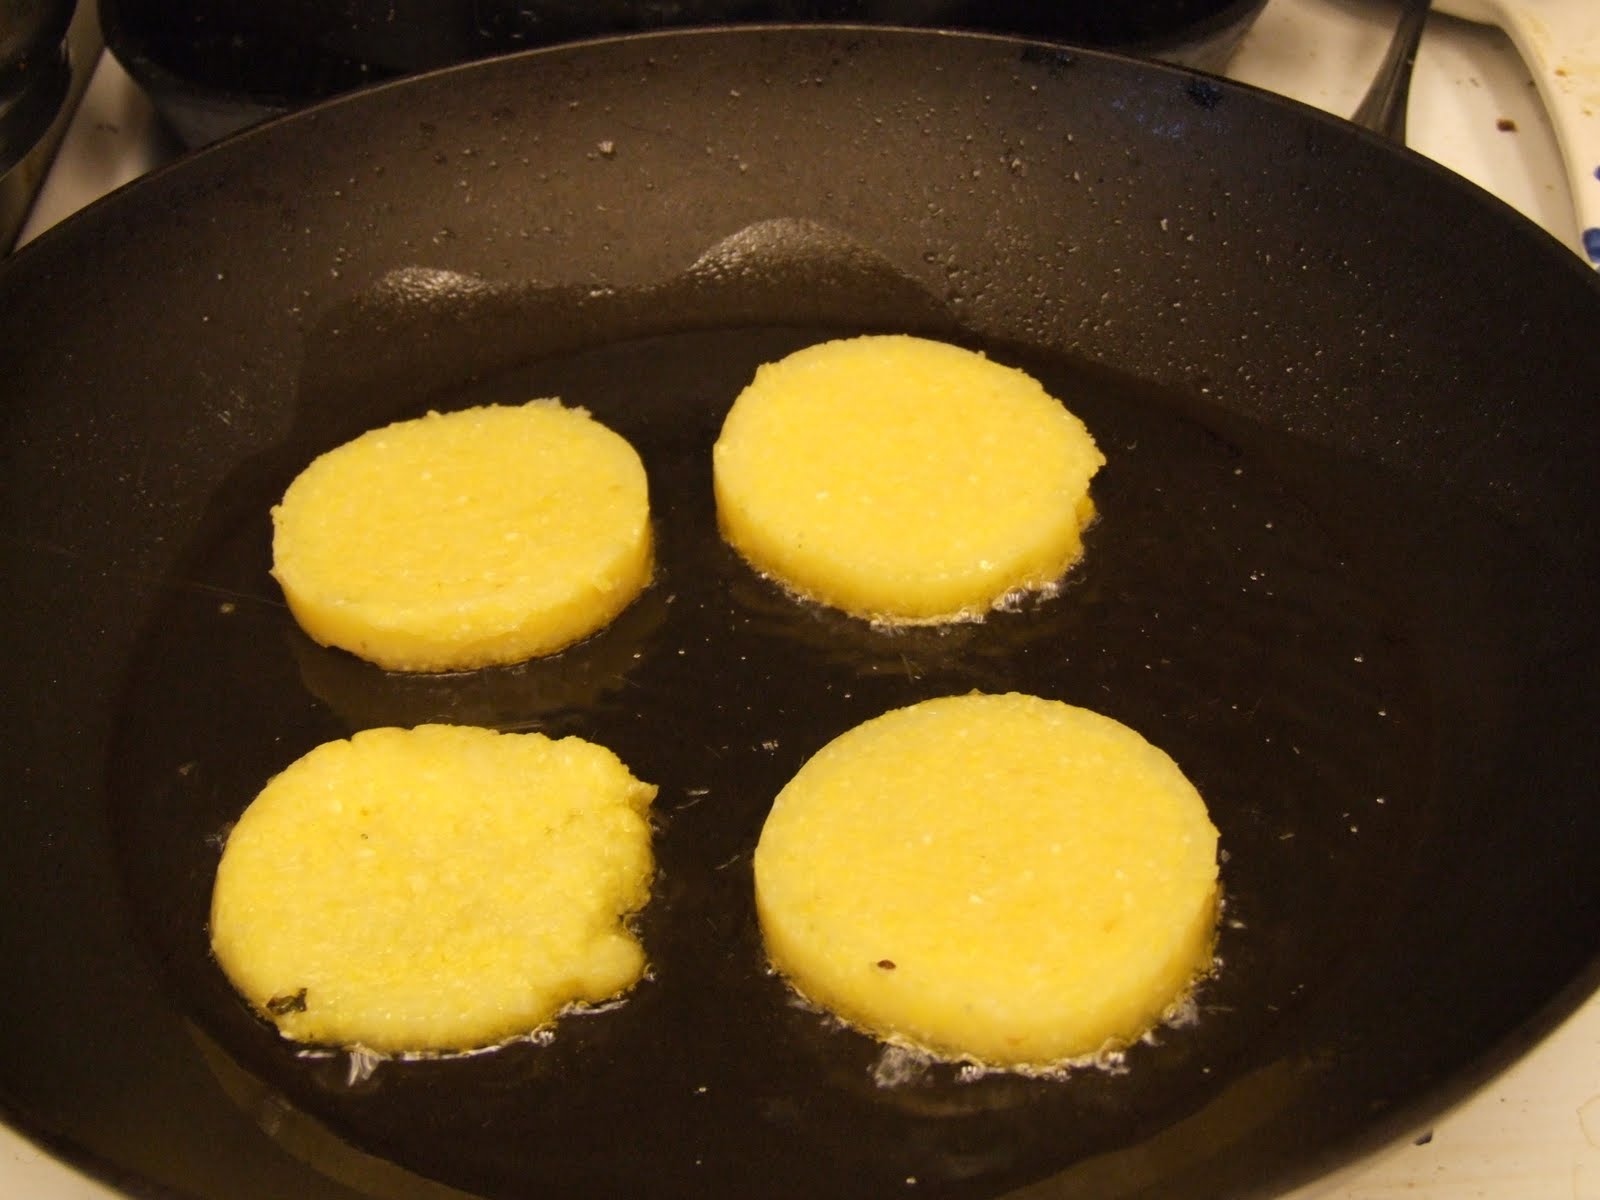
Then, in a medium sauce pan heat enough olive oil to coat the bottom of the pan. Slice the polenta into ½ inch thick slices and place in pan (cook for about 4 minutes on each side)
While the polenta is cooking and the pepper sauce is warming, check on the lamb. Flip the chops after about 4 minutes.
Once you have flipped the lamb it is time to make the sage brown butter sauce.

By the time you have carefully crisped the sage and browned the butter, your polenta should be ready to plate, and you can start to put together your finished dish. Check the lamb, it should be about four minutes since you flipped the lamb and it should be ready to come off the grill, likewise your onions should be tender and have some char marks.
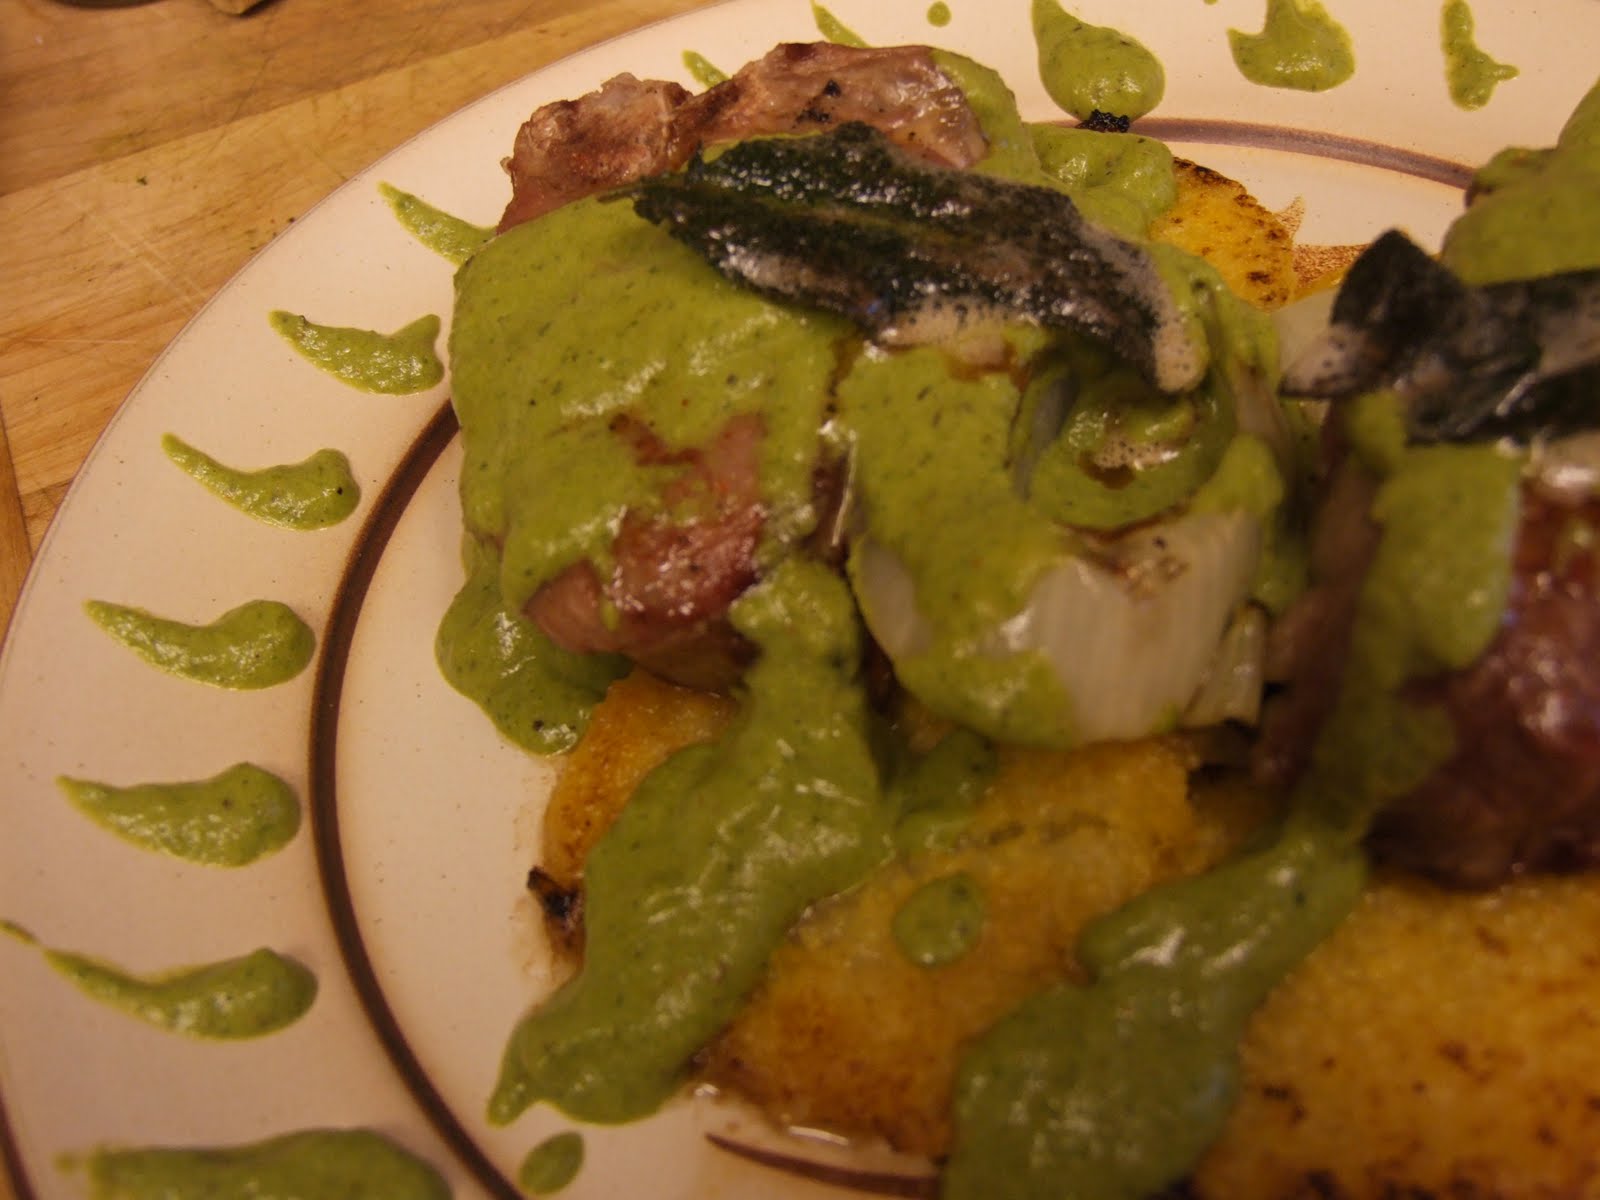
First plate the polenta (I used four circles of polenta forming a square in the center of the plate).
Then plate the lamb chops on top of the polenta
Place the grilled onions around the lamb chops
Then drizzle the brown butter equally on the top of each lamb chop (this is a subtle step but adds a wonderful rich flavor, normally I would just add some ground sage on the lamb before cooking, but this is a great touch that makes this dish particularly special).
Now drizzle the pepper cream sauce over the top of the lamb and around the plate (for fun I made a design with the sauce on the outer edge of the plate)
For a final touch place the crispy sage on top of the lamb.
This process will dirty a ton of dishes, so I suggest setting up the rule that the one who cooks doesn’t do the dishes (unless of course you are just rewarding yourself, then you are out of luck, in that case just drink a bit more wine and worry about the dishes later). It is rich and filling and highly rewarding. It is one where you can have fun plating it and making it look restaurant quality, or just make a mess of it so that you are sure you get all the flavors in as many bites as possible.
Be creative! Procrastinate to the fullest and take an evening to enjoy life through food!
Tuesday, August 10, 2010
Key Lime Pie
Of all the dishes that I make the one that is by far and away the most requested by friends is the key lime pie recipe that came from my aunt. People have requested it as rewards for success and comfort during stressful times and pies (key lime in particular) are great for all moods.

However, the absolute best time for key lime pie is during the summer. It is cool, tart and an extremely tasty way to “beat the heat”. Plus it is way easier to make than the people who will enjoy it think. You earn far more bonus points than the work should suggest. So as summer slips away, far too quickly for my tastes, celebrate the sun and summer relaxation as only a homemade key lime pie can.

So the trick to this key lime pie, is that most of the time I make it, I don’t actually use key limes. To the key lime purists out there, this seems like a travesty that deserves a swift kick out of the kitchen. The first time I had it I was skeptical myself, and while there is a slightly different taste, it is really a wonderful pie. Furthermore I have tried the recipe using all key limes, all standard limes and mix of the two. Personally my favorite is a mix of the two, but ONLY when good really fresh key limes are available, if not just stick with normal limes.

What you need:
Graham crackers (one packet from a box of three packets)
5 tablespoons butter
2 tablespoons sugar
1 teaspoon allspice
4 large eggs
5-8 limes (enough to make ½ cup of lime juice)
1 can (14oz) sweetened condensed milk
For whipped cream topping
Whipping cream
1 ½ teaspoon pure vanilla extract
Sugar to taste
For candied lime zest
Lime zest
1/2 to 1 cup sugar
1/2 to 1 cup water
Preheat oven to 325 and place oven rack to lower middle position.
Zest the limes (you will need ~4 teaspoons of lime zest, but I recommend zesting all of the limes as you can as you can use the leftovers for all sorts of things, including candied lime zest to top the pie).
In medium sized, non-reactive bowl (stainless steel, glass, ceramic) whisk together the yolks of the 4 eggs together with the lime zest for 1 to 2 minutes until the mixture has a light green color (again I recommend setting aside the egg whites due to their versatility, my personal favorite is to make Meringues out of them).
Whisk in the sweetened condensed milk until mixture is smooth
Whisk in the lime juice, making sure that the juice has fully mixed with the thick milk.
Cover and set aside to thicken while you prepare the crust (minimum of 30 minutes).
Break up the graham crackers and mix in a food processor until it is the consistency of sand
Melt the butter.
In medium size bowl mix together the graham cracker crumbs, butter, sugar, and all spice with a fork.
Pour the mixture into a pie plate and press down to make an even thickness across the bottom (I start with a smooth bottomed glass or measuring cup to try to make it level, but move to using my hands when I am refining the process (hands truly are the best tool in a kitchen). For the sides I try to use my two thumbs, one pressing down while the other presses the mixture against the edge of the pie pan until the mixture is compact enough to hold its form.
Bake the crust until it begins to brown and the kitchen is filled with the smell of graham crackers (15-20 minutes.
Remove from the oven
Adjust the oven rack to the middle position and fill the crust with the thickened lime mixture (this must be done while the pie crust is still warm for the best results)
Bake until the center is firm but still wiggles when you jiggle the pan (15-20 minutes).
Let cool on the counter top for at least 3 hours. For an extra cool pie wrapped with plastic wrapped or cover with foil, making sure you don’t touch the foil to the pie filling and chill in refrigerator.

Candied lime zest
In a heavy bottomed sauce pan pour in equal parts sugar and water (between 1/2 and 1 cup depending on how much simple syrup you want to make). Heat mixture over medium heat stirring frequently, when the sugar is fully dissolved and the mixture begins to bubble add the left over lime zest, lower heat to medium low and slowly simmer the zest in the mixture for 3 to 5 minutes.
Stain out the candied lime zest, saving the liquid as you now have a wonderful lime simple syrup.
Whip together the whipping cream, sugar and vanilla extract until you have a fairly thick whipped cream.
Once the pie is cooled you can place the whipped cream onto of the pie, shape it as desired and top the whipped cream with the candied lime zest.

However, the absolute best time for key lime pie is during the summer. It is cool, tart and an extremely tasty way to “beat the heat”. Plus it is way easier to make than the people who will enjoy it think. You earn far more bonus points than the work should suggest. So as summer slips away, far too quickly for my tastes, celebrate the sun and summer relaxation as only a homemade key lime pie can.

So the trick to this key lime pie, is that most of the time I make it, I don’t actually use key limes. To the key lime purists out there, this seems like a travesty that deserves a swift kick out of the kitchen. The first time I had it I was skeptical myself, and while there is a slightly different taste, it is really a wonderful pie. Furthermore I have tried the recipe using all key limes, all standard limes and mix of the two. Personally my favorite is a mix of the two, but ONLY when good really fresh key limes are available, if not just stick with normal limes.

What you need:
Graham crackers (one packet from a box of three packets)
5 tablespoons butter
2 tablespoons sugar
1 teaspoon allspice
4 large eggs
5-8 limes (enough to make ½ cup of lime juice)
1 can (14oz) sweetened condensed milk
For whipped cream topping
Whipping cream
1 ½ teaspoon pure vanilla extract
Sugar to taste
For candied lime zest
Lime zest
1/2 to 1 cup sugar
1/2 to 1 cup water
Preheat oven to 325 and place oven rack to lower middle position.
Zest the limes (you will need ~4 teaspoons of lime zest, but I recommend zesting all of the limes as you can as you can use the leftovers for all sorts of things, including candied lime zest to top the pie).
In medium sized, non-reactive bowl (stainless steel, glass, ceramic) whisk together the yolks of the 4 eggs together with the lime zest for 1 to 2 minutes until the mixture has a light green color (again I recommend setting aside the egg whites due to their versatility, my personal favorite is to make Meringues out of them).
Whisk in the sweetened condensed milk until mixture is smooth
Whisk in the lime juice, making sure that the juice has fully mixed with the thick milk.
Cover and set aside to thicken while you prepare the crust (minimum of 30 minutes).
Break up the graham crackers and mix in a food processor until it is the consistency of sand
Melt the butter.
In medium size bowl mix together the graham cracker crumbs, butter, sugar, and all spice with a fork.
Pour the mixture into a pie plate and press down to make an even thickness across the bottom (I start with a smooth bottomed glass or measuring cup to try to make it level, but move to using my hands when I am refining the process (hands truly are the best tool in a kitchen). For the sides I try to use my two thumbs, one pressing down while the other presses the mixture against the edge of the pie pan until the mixture is compact enough to hold its form.
Bake the crust until it begins to brown and the kitchen is filled with the smell of graham crackers (15-20 minutes.
Remove from the oven
Adjust the oven rack to the middle position and fill the crust with the thickened lime mixture (this must be done while the pie crust is still warm for the best results)
Bake until the center is firm but still wiggles when you jiggle the pan (15-20 minutes).
Let cool on the counter top for at least 3 hours. For an extra cool pie wrapped with plastic wrapped or cover with foil, making sure you don’t touch the foil to the pie filling and chill in refrigerator.

Candied lime zest
In a heavy bottomed sauce pan pour in equal parts sugar and water (between 1/2 and 1 cup depending on how much simple syrup you want to make). Heat mixture over medium heat stirring frequently, when the sugar is fully dissolved and the mixture begins to bubble add the left over lime zest, lower heat to medium low and slowly simmer the zest in the mixture for 3 to 5 minutes.
Stain out the candied lime zest, saving the liquid as you now have a wonderful lime simple syrup.
Whip together the whipping cream, sugar and vanilla extract until you have a fairly thick whipped cream.
Once the pie is cooled you can place the whipped cream onto of the pie, shape it as desired and top the whipped cream with the candied lime zest.
Thursday, August 5, 2010
The importance of food in life
Recently CNN's eatocracy website had an article about the importance of the shared interest in food for couples.
The article got me thinking a little bit about just how important a trait love and especially true appreciation of food is to me. I understand and respect different tastes and lifestyles and have no problem sharing meals with vegetarians or vegans, or dinning with people who enjoy some of the few foods that I just don't like. To each there own. But I have noticed that I do get very frustrated when I around people who don't see the value and beauty in their food. Eating simply as a means for survival doesn't make any sense to me.
I truly believe that cooking helps solidify a connection with food. Developing an understanding for flavors and the process and time that goes into preparation, cooking and presentation and how all that matters in enjoying the experience of the meal. I'm not saying that every meal, or even the majority of meals need to illicit some sort of deep emotional response or activate the artistic appreciation in our minds (I am as guilty as the next with my turkey and cheese sandwiches for lunch 5 days a week) but I believe that being able to have such a connection from time to time is important. I have been to restaurants with all times and I have shared great meals with all types and truly there are few things more annoying to me that sharing such a meal (whether it is one I made myself or when to to a restaurant to experience) with someone who doesn't value food for its benefits beyond substance.
To this extend I agree with some of what is being said in the article. I have a hard time connecting with people who don't see food in a way similar to myself. I have got myself in trouble with more than a few of my female friends when they talk about avoiding certain foods that they love because they need to diet (which puts me on the edge of a whole other topic that I wish to avoid here). In the past, and even today, I would get frustrated with them, I am not saying that they should indulge every day, but I have never understood total restraint and used to speak my mind, a pointless endeavor as I have discovered. And this comes from people who I generally know appreciate food, so I can only imagine my reaction to those that don't value the process of preparing high quality and beautiful food.
To get back to my main point, I think that cooking, while the best form of procrastination, is also a window into food appreciation and the opposite holds true as well; if you truly want to excel at cooking you have to love food, indulge in guilty pleasures, succumb to the warming power of real butter, pamper your proteins and value fresh vegetables. You have to be willing to commit the time and give the process the full attention it deserves. It is a bit cliché to say but food cooked with love truly does taste better.
The article got me thinking a little bit about just how important a trait love and especially true appreciation of food is to me. I understand and respect different tastes and lifestyles and have no problem sharing meals with vegetarians or vegans, or dinning with people who enjoy some of the few foods that I just don't like. To each there own. But I have noticed that I do get very frustrated when I around people who don't see the value and beauty in their food. Eating simply as a means for survival doesn't make any sense to me.
I truly believe that cooking helps solidify a connection with food. Developing an understanding for flavors and the process and time that goes into preparation, cooking and presentation and how all that matters in enjoying the experience of the meal. I'm not saying that every meal, or even the majority of meals need to illicit some sort of deep emotional response or activate the artistic appreciation in our minds (I am as guilty as the next with my turkey and cheese sandwiches for lunch 5 days a week) but I believe that being able to have such a connection from time to time is important. I have been to restaurants with all times and I have shared great meals with all types and truly there are few things more annoying to me that sharing such a meal (whether it is one I made myself or when to to a restaurant to experience) with someone who doesn't value food for its benefits beyond substance.
To this extend I agree with some of what is being said in the article. I have a hard time connecting with people who don't see food in a way similar to myself. I have got myself in trouble with more than a few of my female friends when they talk about avoiding certain foods that they love because they need to diet (which puts me on the edge of a whole other topic that I wish to avoid here). In the past, and even today, I would get frustrated with them, I am not saying that they should indulge every day, but I have never understood total restraint and used to speak my mind, a pointless endeavor as I have discovered. And this comes from people who I generally know appreciate food, so I can only imagine my reaction to those that don't value the process of preparing high quality and beautiful food.
To get back to my main point, I think that cooking, while the best form of procrastination, is also a window into food appreciation and the opposite holds true as well; if you truly want to excel at cooking you have to love food, indulge in guilty pleasures, succumb to the warming power of real butter, pamper your proteins and value fresh vegetables. You have to be willing to commit the time and give the process the full attention it deserves. It is a bit cliché to say but food cooked with love truly does taste better.
Monday, August 2, 2010
Recipes, it’s a love hate thing
If you have read through any of my posts, than you may have been able to pick up on my hesitation to give to precise of directions and hopefully my encouragement for experimentation comes through. Personally when I am cooking I rarely am using a set recipe, and I think they cause a lot of beginning cooks more headaches than help, and can actually hinder any real learning process. One of my housemates has shelves full of recipe books and on occasion I thumb through them and will find some dishes that sound fascinating. Yet, I can count on one hand the number of times that I have kept the book out while I was cooking. I think it is better to see recipe books as idea books; they are great for inspiration and getting a basic understanding for what you need to get a type of flavor. After this point I think they become a hindrance.
Cooking engages all the senses and when we focus on the lists, the timing and the temperatures that many recipes provide we fail to use our senses in the process. Now baking is different, so much of it is chemistry that following recipes becomes important. The pages of my cookbooks that are stained and warped are those of baking recipes because in those cases I have my book out and on the counter as I am cooking. All the other pages tend to be crisp and clean. When you cook listen to your senses and learn to trust them. You can tell when garlic is about to brown by the way it changes smells, you can tell how done meat is by its feel, watching the foam of butter can tell you when it is about to go from having the wonderful nutty flavor of browned butter to the rather unpleasant flavor of burned butter, you can hear when a sear is ready by the change of the sizzle in the pan. Cookbooks try to tell you these things through timing and temperature (occasionally they will talk about sight and how something should look when it is ready) but the problem is that every kitchen is different, every burner is unique, every pan heats differently, every cut of meat has a different thickness or fat content and all of these things will impact timing. And this doesn’t even touch on personal preferences, the author of a cookbook may think that two spices are perfect for broiling a chicken breast, but you may not.
This is the heart of my love hate relationship with recipes they are great for getting the ball rolling, but too much reliance on them is stifling. When I am cooking with others, I frequently have to try to hide my frustration when people measure things unnecessarily and refuse to think outside the confines of the recipe.
Sure there will be setbacks when you strike out on your own; I recall the first time I tried to make a rather simple pasta dish. I was 13 and on my own for dinner, I prepped my pasta and went to work on a simple sautéed onion and garlic sauce, when it came time to add the spices I was just a bit heavy handed and the result was a pretty much uneatable dish, even a mountain of Parmesan could not save it. But I learned, I learned the overpowering nature of some spices, the importance of textures (too much dried spice mixed with olive oil makes a rather unpleasant past like substance), but these are things that recipe books don’t tell you. Sure by following them you may avoid a similar mistake, but you don’t really know why.
This is why I try to leave my posts as open ended as possible, and why I will try to describe the use of all senses in cooking and why so many of my measurements are approximations. The truth is in many cases I have no clue how much of an ingredient I use, and when I have tried to get a more exact measurement of the sake of helping others, the dish has come out tasting different and off.
Break free of the confines of recipes, seem them as idea generators and a guide for the basic steps, from there step out and have fun!
Cooking engages all the senses and when we focus on the lists, the timing and the temperatures that many recipes provide we fail to use our senses in the process. Now baking is different, so much of it is chemistry that following recipes becomes important. The pages of my cookbooks that are stained and warped are those of baking recipes because in those cases I have my book out and on the counter as I am cooking. All the other pages tend to be crisp and clean. When you cook listen to your senses and learn to trust them. You can tell when garlic is about to brown by the way it changes smells, you can tell how done meat is by its feel, watching the foam of butter can tell you when it is about to go from having the wonderful nutty flavor of browned butter to the rather unpleasant flavor of burned butter, you can hear when a sear is ready by the change of the sizzle in the pan. Cookbooks try to tell you these things through timing and temperature (occasionally they will talk about sight and how something should look when it is ready) but the problem is that every kitchen is different, every burner is unique, every pan heats differently, every cut of meat has a different thickness or fat content and all of these things will impact timing. And this doesn’t even touch on personal preferences, the author of a cookbook may think that two spices are perfect for broiling a chicken breast, but you may not.
This is the heart of my love hate relationship with recipes they are great for getting the ball rolling, but too much reliance on them is stifling. When I am cooking with others, I frequently have to try to hide my frustration when people measure things unnecessarily and refuse to think outside the confines of the recipe.
Sure there will be setbacks when you strike out on your own; I recall the first time I tried to make a rather simple pasta dish. I was 13 and on my own for dinner, I prepped my pasta and went to work on a simple sautéed onion and garlic sauce, when it came time to add the spices I was just a bit heavy handed and the result was a pretty much uneatable dish, even a mountain of Parmesan could not save it. But I learned, I learned the overpowering nature of some spices, the importance of textures (too much dried spice mixed with olive oil makes a rather unpleasant past like substance), but these are things that recipe books don’t tell you. Sure by following them you may avoid a similar mistake, but you don’t really know why.
This is why I try to leave my posts as open ended as possible, and why I will try to describe the use of all senses in cooking and why so many of my measurements are approximations. The truth is in many cases I have no clue how much of an ingredient I use, and when I have tried to get a more exact measurement of the sake of helping others, the dish has come out tasting different and off.
Break free of the confines of recipes, seem them as idea generators and a guide for the basic steps, from there step out and have fun!
Tuesday, July 27, 2010
Peach-Blueberry Crisp
Living in Santa Barbara my appreciation of summer is a bit less then when I was living in rainy Seattle, chilly Estonia or temperamental Colorado. Days of rain, hours of darkness and late season snow storms help one appreciate the warming power of the sun and the smile educing wonder of a brilliant blue sky. It means long summer days and relaxed evenings enjoy the late setting sun. It is the season of BBQs and family reunions. Still even in a place where the effects of summer might be less extreme, summer still means fresh fruit and berries! A relatively cool spring here has meant that berries are lasting a bit later into the summer than they normally do that the farmers market. This is very good news, as it means I have a ton of options of trying to cure my enormous sweet tooth. I love sweets of all kinds and normally have some sort of dessert every night, even if it is just a few squares of chocolate. Rich and dense desserts and chocolate are wonderful, but sometimes something with a nice balance between tart and sweet is just what the soul needs. Enter the wonderful world of fruit and berry crisps.

There are so many types of crisps and cobblers that I think way to go is to see what fruit looks best (or what of your fruit you need to use up before it goes bad). Whip up the right dough add in some spices and top the final creation off with ice cream and you have yourself a wonderful treat to end a beautiful summer evening.
This week I picked up some local peaches, blueberries and blackberries. After a loaf of bread fell on my peaches and bruised them up a bit (kitchen chaos at its finest) my hand was forced and the peaches were destined for a crisp. Add in some blueberries and you have a good balance of flavors and something that is pretty simple to make, but will pass some time.
There are a lot of ways to put together a crisp as well as types of dishes you can bake them in, but since I am a big fan of the crisp part, I tend to put crisp on both the top and bottom of the baking dish and I used individual ramekins. As I will go into detail in a later post, I really don’t like measuring things, I tend to adjust as I go, and this includes my crisp mix.
So here is what you need to make two to three servings.
1 large or two medium sized peaches
½ carton of blueberries
Rolled oats
Flour
Brown sugar
Butter (around a ½ stick, cut into pieces)
Sugar
Cinnamon
Allspice
Nutmeg
Ground ginger
Salt
Cornstarch
Peel the peach(es) and slice into thin slices
Place the peaches in a medium sized mixing bowl
Add the blueberries
Add 1 tablespoon sugar
Add 1 teaspoon cinnamon
Add ½ teaspoon ginger
Add ½ to 1 teaspoon cornstarch
Mix all the ingredients together and set aside
Preheat oven to 325
In food processor add a handful of rolled oats (~3/4 cup)
Add ½ flour
Add 1/3 cup to ½ cup brown sugar
Add ½ teaspoon salt
Add ½ teaspoon nutmeg
Add ½ teaspoon to 1 teaspoon cinnamon
Pulse food processor to mix dry ingredients
Add about half of the cut butter
Blend in butter for about 1 minute
Check the mixture, it should stick together in approximately pea sized clumps.
If the mixture is still too dry add additional pieces of butter until mixture is moist.
Press some of the crisp mixture into the bottom of two single serving ramekins. Pour in the berry-peach mixture. Then cover the top of the mixture with the crisp dough (cover completely and gently press down if you want a thicker crisp layer.
Place ramekins in over and bake for 30 minutes. Check to see if top is browned and liquid is bubbling out the sides. If the top needs more time to brown keep in the oven a bit longer.
When the crisps have finished baking take them out of the oven and top with a couple scoops of ice cream. Vanilla is classic, but I find that dolce de leche is a great contrast to the peach blueberry filling.

There are so many types of crisps and cobblers that I think way to go is to see what fruit looks best (or what of your fruit you need to use up before it goes bad). Whip up the right dough add in some spices and top the final creation off with ice cream and you have yourself a wonderful treat to end a beautiful summer evening.
This week I picked up some local peaches, blueberries and blackberries. After a loaf of bread fell on my peaches and bruised them up a bit (kitchen chaos at its finest) my hand was forced and the peaches were destined for a crisp. Add in some blueberries and you have a good balance of flavors and something that is pretty simple to make, but will pass some time.
There are a lot of ways to put together a crisp as well as types of dishes you can bake them in, but since I am a big fan of the crisp part, I tend to put crisp on both the top and bottom of the baking dish and I used individual ramekins. As I will go into detail in a later post, I really don’t like measuring things, I tend to adjust as I go, and this includes my crisp mix.
So here is what you need to make two to three servings.
1 large or two medium sized peaches
½ carton of blueberries
Rolled oats
Flour
Brown sugar
Butter (around a ½ stick, cut into pieces)
Sugar
Cinnamon
Allspice
Nutmeg
Ground ginger
Salt
Cornstarch
Peel the peach(es) and slice into thin slices
Place the peaches in a medium sized mixing bowl
Add the blueberries
Add 1 tablespoon sugar
Add 1 teaspoon cinnamon
Add ½ teaspoon ginger
Add ½ to 1 teaspoon cornstarch
Mix all the ingredients together and set aside
Preheat oven to 325
In food processor add a handful of rolled oats (~3/4 cup)
Add ½ flour
Add 1/3 cup to ½ cup brown sugar
Add ½ teaspoon salt
Add ½ teaspoon nutmeg
Add ½ teaspoon to 1 teaspoon cinnamon
Pulse food processor to mix dry ingredients
Add about half of the cut butter
Blend in butter for about 1 minute
Check the mixture, it should stick together in approximately pea sized clumps.
If the mixture is still too dry add additional pieces of butter until mixture is moist.
Press some of the crisp mixture into the bottom of two single serving ramekins. Pour in the berry-peach mixture. Then cover the top of the mixture with the crisp dough (cover completely and gently press down if you want a thicker crisp layer.
Place ramekins in over and bake for 30 minutes. Check to see if top is browned and liquid is bubbling out the sides. If the top needs more time to brown keep in the oven a bit longer.
When the crisps have finished baking take them out of the oven and top with a couple scoops of ice cream. Vanilla is classic, but I find that dolce de leche is a great contrast to the peach blueberry filling.
Tuesday, July 20, 2010
Fried Squash Blossoms

Squash blossoms are not bursting with flavor; however, like so many other wonderful food ingredients the underlying savory and buttery flavors combined with a unique velvet-like texture make them a great item to dredge in flour and spices, stuff with cheese (if you so desire) and fry. Once you try one I will promise that you will burn your fingers and the roof of your mouth by eating a second before it has cooled enough, they are that good!
In terms of taking you away from work these fried blossoms of goodness take a bit of prep work, and if you don’t have anyone cleaning up for you, they dirty a bunch of dishes that will take a while to clean. The actual cooking is really quick and the process once you get the hang of it is pretty easy. If you are looking for something that really takes your mind away from your work these will do the trick as they are hands on all the way through and really don’t have much down time once you get started. The reward is a very unique dish that sounds impressive when you share it with others and tastes equally impressive.
To make the cooking process easy and as streamlined as process, preparation is key for this one. Normally I am a rather free spirit in the kitchen, doing things at the last minute, changing what I am doing mid process and generally disregarding any sort of organization (amazing how cooking styles can mirror life at time). However, when putting together an assembly line (which is basically what you are doing when building a frying station) it is best to stick to your plan.
So here is what you need to set up for cooking. These are in order from furthers away from your heat toward your burner.
One large bowl or piece of Tupperware filled with water and ice (for the squash blossoms)
Optional: One small plate to place sliced cheese for stuffing
One shallow bowl for your wet mix
One shallow bowl for your dry mix
One wok or deep frying pan for frying.
One plate lined in napkins on the other side of the stove to place the finished blossoms on to cool.
With a good station like this set it makes it easy to do your best to keep one hand “wet” and one hand “dry” which will limit the amount of sticky flour paste that will build up on your hands. While it is great in theory for those of us that that have one really dominate hand chances are all good intentions will go right out the window and instead you will have a roll of paper towels ready to continually clean off your hands.
Ingredients:
Squash Blossoms – these are highly seasonal so be sure to make this when the farmers market has them, or they are on the squash plants you have in your garden (should you be so lucky)
1-2 eggs
½ cup to 1 cup of all purpose flour

~ 2 teaspoons salt (since the flavor the salt is noticeable I try to use a high quality sea salt)
~ 1 teaspoon crack black pepper
~ 1 teaspoon ground ginger
~ ½ - 1 teaspoon paprika
~ ½ teaspoon ground sage
~1/4 – ½ teaspoon cayenne pepper
Basque shepherds cheese (Manchengo cheese or really any type of cheese that you enjoy, though personally I would stay away from cheddar and swisses for this dish)
Vegetable or canola oil for frying (the amount will depend on the pot/wok you are doing your frying in) Make sure you have enough to create a vat of hot oil deep enough to allow the blossoms to float while frying.
A quick note on spices: What I have listed is just a general mix that I have found particularly pleasing to me. However, playing around with both the amount and the type of spices that you put into this mix is really key to making this dish well. Everyone will have a different set of flavors that they think work. I use different amounts and spices if I am stuffing the squash blossoms with cheese or just frying them up without. Part of my general dislike for cook books is that people too often follow them without question. Trust in yourself to know the flavors that you like best. If they don’t work together, well than you have learned a lesson for next time.
Preparation (part 1):
 Place your squash blossoms in the ice water. To this day every time I make this I wonder why the blossoms need to be cold, but for some reason they come out much better when they are really cold heading into the cooking process. I also remove the stamen (as well as the rest of the inner workings of the flowers). This isn’t necessary but they don’t taste quite as pleasant as the rest of the flower so I think it is worth the extra time.
Beat the egg with a few tablespoons of water to make the wet mix
Mix together the flour and spices to make the dry mix.
Cut your cheese into small strips, probably no more than an inch in length unless you have some really big squash blossoms.
Get your frying oil ready to heat.
Now that you have your assembly line all set to go you are ready to get frying.
Preparation (part 2)
While the oil is heating take your first squash blossom and gently squeeze off excess water.
If you are stuffing the blossoms with cheese place the cheese inside the petals and give them a small twist to create an enclosed space
Then dip the flower in the egg mixture.
Once it is well coated, hold the blossom above the bowl and allow excess egg to drip back into the bowl.
Then move the blossom into the flour mixture. Make sure that all sides are well coated.

Gently drop the blossom into the hot oil.
As this point you can start prepping a second blossom
Let the blossom cooking in the oil for around a minute. Then flip it over and let it cook for another minute.
Remove (with slotted or wired spoon to allow oil to drip) and place on paper towel covered plate to cool.
I normally have no more than three blossoms in the oil at any time. You don’t want your oil to cool down too much as you are cooking. If the oil is not hot enough than the flour mixture and the flower itself soaks up too much oil and you get a far less appetizing very oily bite. When done right the blossoms come out slightly crispy on the outside but it is still easy to tell that you are eating the petals of a flower.

Subscribe to:
Posts (Atom)